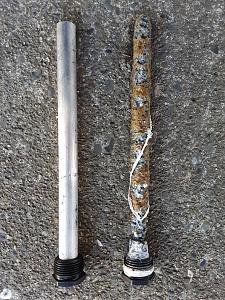
As the camping season approaches (although for us at Gavins Point, camping season is year round), it’s pretty important to make sure your RV is in the best shape before hitting the road. One part of RV maintenance that often gets overlooked is checking and replacing the anode rods.
What are anode rods, and why are they important?
Anode rods are metal rods that are installed inside the RV water heater tank. They are typically made of magnesium or aluminum and are designed to protect the tank from corrosion. When the RV water heater is in use, the anode rod corrodes instead of the tank, sacrificing itself like a brave soldier to prevent the tank from corroding and rusting out.
Over time, the anode rod will corrode to the point where it is no longer effective. If left unchecked, this can obviously lead to problems, including leaks and water damage. Replacing the anode rod at the beginning of the camping season is a great idea as part of RV maintenance that can save you a lot of trouble and money in the long run.
How to check and replace the anode rod on your RV?
Checking and replacing the anode rod on your RV is a relatively simple process that can be done with a few basic tools. Here’s how to go about it:
- Let Gavins Point Recreational Center do it for you! From basic RV maintenance to more significant RV repairs, there’s nothing we can’t handle. Our RV service technicians know your recreational vehicle inside and out, so you can rely on us to complete every job correctly. Plus, we offer a mobile RV repair near you too!
But if you’re the sort of person to do things on their own, here’s what you do:
- Turn off the RV water heater and allow it to cool down completely.
- Locate the water heater tank. This is usually located outside the RV and will have a metal cover that can be removed to access the tank.
- Remove the anode rod by using a socket wrench or other appropriate tool. The anode rod may be difficult to remove, so you may need to use some force.
- Inspect the anode rod for signs of corrosion. If the rod is less than 50% depleted, you can clean it and reinstall it. If it is more than 50% depleted, it’s time to replace it.
- Install the new anode rod by hand and tighten it with a wrench. Be careful not to overtighten the rod, as this can damage the threads.
- Close the water heater tank cover and turn the water heater back on.
As you can see, checking and replacing the anode rod on your RV is pretty simple, but essential. By taking a few minutes to inspect and replace the anode rod at the beginning of the camping season, you can ensure that your RV is ready for all your upcoming adventures.

